Showing posts with label fitting. Show all posts

Wednesday, January 21, 2015

Simplicity 1425 Beginning

What? Two posts in as many days?! Yes! It's true, I was quite industrious this weekend!

Because I had to halt construction on my Burda pattern (that post is here) I started yet another project.  This is the pattern (click here to see it on Simplicity's website):


I'll be doing view B with the sheer collar.  I debated doing view A, but I was worried about the chiffon fabric I chose raveling since I can't serge the edges (college problems!).  I absolutely adore the peplum style, but I have nothing of the sort in my wardrobe!  My neighbors gave me some lovely fabric that I've been dying to use for this pattern.

Materials:

As I mentioned before, my neighbor gifted me with fabric that I set aside to make this months ago.  It's a polka-dotted cotton and I'm tempted to say they're swiss dots?  I hesitate to call it that because I've only seen swiss dot on sheer fabric, but I think it goes for solids, too.  Anyways, each dot is a little velvety and gives the fabric an amazing texture.

The swiss dot is in the foreground and chiffon is in the background
For the sheer collar, I purchased some navy chiffon from JoAnn Fabrics; it matches the dots perfectly!

I have not yet bought the buttons, but they'll probably be navy and small (to match the polka dots).

Cutting Out and Fitting:

This pattern was super easy to cut out.  Not too many pieces and not too much fabric required.  I did use pinking shears to cut the edges since I am currently serger-less. It worked really well for both the cotton and chiffon.

Fitting this was interesting (as fitting always is).  In my Christmas dress post (which you can find here), I mentioned that I cut out my Simplicity pattern a size 6 in the bust and a size 10 at the waist.  I thought that this blouse might fit exactly the same, but alas, I was wrong!  I did not make a muslin this time around (naughty naughty!). To be fair, I had no extra material to  make one here in my dorm.  It was extra stressful not knowing for sure how it would fit, but I ended up just going off my gut, the finished measurements on the pattern pieces, and some good ole' internet digging.  

I ended up cutting out a straight size 6, meaning that all measurements were size 6.   According to the pattern, I should be a size 8 in the bust (I'm 31.5").  I checked the finished measurements and for bust size 8, which was 35".  That's 3.5" of ease! I usually like about 2" of ease at my bust, so that's why I decided on size 6, which has a finished bust measurement of 34" (2.5" of ease).

The pattern also says I should be a size 12 at the waist (I'm 26.5").  My spidey-senses tingling, I though I should check those measurements, too.  For size 12, it's 30.5"!  Wow!  I prefer 1 or 2 inches at the waist, but not 4.  I am, however, beginning to see a trend in Simplicity's sizing, which will definitely help for subsequent projects.  Size 6 at the waist is 27.5" for the finished measurement, which sounded a little small but I did some digging online and I came across the Llaydbird blog (I highly recommend visiting here). She mentions there being extra space in the waist of the pattern.  That made me feel better about making the waist such a tiny size, and so I stuck with the size 6 and cut it out.

Beginning Construction:

This was really straightforward.  I haven't come across any surprises yet and it seems perfect for both the discerning fashionista and beginning sewer.  The only thing I added was zig-zagging to the edges of chiffon.  I had already pinked them, but I wanted to be extra safe!  Here's my progress:

Simplicity 1425

I don't have much more to go, but I have to wait until I get some bias tape to finish it off. I'm loving the results so far and it fits wonderfully (even the waist!).  The only thing I wish I had done was line it, although it doesn't say to in the directions.  My cotton is a wee bit see-through.  I think it'll be fine, you can't see my undergarments so it's not too scandalous.

Let me know if you have any questions!

Until next time,

-The Gretchen


Tuesday, January 20, 2015

Burda 6853 Beginning

Hello!

I'm back!  Yes, I haven't posted the finished product of my Christmas dress, I had to leave for college before I got around to it.  But I swear it's done!  Pictures will come eventually! I have since moved on, as you may have guessed, to Burda 6853 (you can find it online here). This is what the pattern looks like:

The pattern!
I'll be doing view "B".  I absolutely fell in love when I saw it!  I love how Chanel inspired it is while also being youthful (hence Burda "young," haha).  Here's a picture of some classic Chanel suits, for reference (and so you don't think I'm a total nutcase!):

The suits!
The pattern definitely isn't an exact replication, but in my mind it takes the idea of the classic suit in a different direction.  I love the black trim and clean lines of the original, but I also love the pleats of the pattern!

Now onto my work....

The Materials

I chose this bluish-greenish-grayish wool (if you can think of a more exact name for the color, let me know!) from JoAnn Fabrics.  I absolutely loved the weight and unique color; perfect for the winter season.


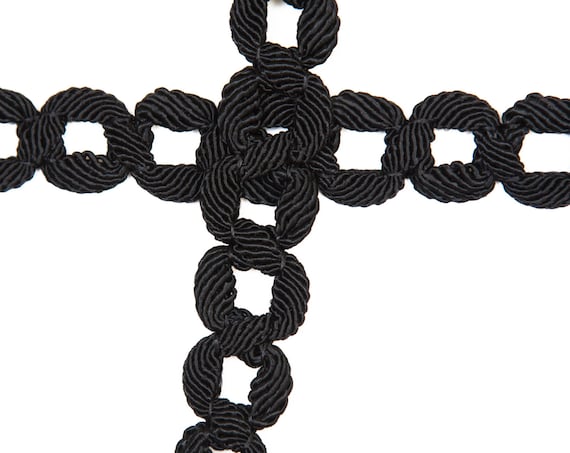
I initially had some trouble deciding on trim.  The trim on the pattern cover is quite wide and I thought it looked considerably wider than the 3/4 in. trim called for.  I couldn't find exactly what I was looking for at the store so I ended up buying this 1 1/2 in. Project Runway-inspired trim:


It's nice, but I soon discovered that it was way too wide!  I should've known, but I was so excited to get started.  I ended up icks-naying that and bought this trim from Etsy:


I haven't gotten it in the mail yet, but I'm hopeful!  It's 1 inch wide and supposedly vintage, which always makes me happy.  I wasn't sure how I felt about the open chain concept and being able to see the fabric underneath (not very Chanel).  But in the end I decided that it was such a unique trim along with being the only one I liked, so it was worth the risk.

Finally, the buttons:


Just your sort of run-of-the mill, classic gold buttons.

Cutting and Fitting

I don't have too much to say about cutting out or fitting.  Burda usually does an excellent job sizing its garments to the way I like them to fit on me (they run very true to size).  I cut out the bust a size 8 and my hips a size 10.  From what I've made so far, it fits like a dream!

Construction

Once again, not too much to say.  The directions are relatively straightforward and I had no issues.  But pleating can be tedious!  It's worth it in the end, but keep in mind if you've never pleated or are ironing-adverse, you may be in for quite a learning curve.

 I understitched the collar even though the directions don't tell you to.  My lining was flipping outside, so if you have that problem, understitiching may help!

And then there's putting on the trim...  I couldn't figure out when to do that, but I found that the very last direction is to put all the trim on after the garment is constructed (other than the trim on the pockets).  I didn't really want to do that, partially because I don't want to see the trim stitching on my lining.  I've halted construction until I get the trim, but here it is so far:

Burda 6853
The threads on the bottom are basting to keep the pleats in place!

I've put together the body of the dress and attached the lining to the neck, but not the arm holes.  I've also put together the sleeves but not attached them yet. And I put in my label!

So gratifying to get it in!! Officially mine!
That's it!  I'll be posting pictures of the finished product after I get my trim, but if you have any questions in the meantime, let me know.

Until next time!

-The Gretchen

Tuesday, November 25, 2014

Simplicity 1250 - Fitting and Cutting Out

Alas! I have begun my Christmas dress! And a month before Christmas; I'm rather impressed with myself.  If you're just dropping in now, I'm making Simplicity pattern 1250 for my Christmas dress (fingers crossed!).  You can find my initial planning post here.  You can also find my finished product here!

The pattern (I'm doing view A)
Simplicity 1250


Firstly: my fabric choices! I did stick to the originally planned plaid with black lace.  Upon visiting both Hancock and Joann's I realized my selection was slim and I had take what I could get.  There was literally next to no taffeta-esque tartan in stock at my stores this year!  It's a little weird, especially considering that there has been an abundance in previous years.  And it was slim pickings online, too!  Ah well, I'm pretty pleased with my choice anyways.

The plaid with lace and gold buttons

Red Plaid Lace Buttons

 The  classic red tartan with green is growing on me.  Plus it's got some shiny gold to sparkle it up!

After bringing my fabric home, I was very well behaved and did make a muslin for the top bustier area.  I would highly recommend doing it due to the close fitting nature of the bustier, even if you normally avoid making muslins (as I do) .  I ended up doing two, one in muslin and one in a red taffeta that's a similar to the plaid I'll be using.

Measuring/Ease
My bust measurement is 32" and my waist is 26".  I'm in between the sizes specified on this pattern, with a size 10 at the bust being 32.5" and a size 12 at the waist being 26.5" (pretty close).  Normally Simplicity patterns give quite a bit of ease, but this pattern surprised me. On the pattern tissue it says that there is 2" of ease for the bust (34.5" finished measurement for size 10) and 1" of ease at the waist (27.5" finished measurement for size 12).  Much less ease than expected, but it sounded good to me!

Muslin I
The initial muslin was... interesting.  I decided that 2" of ease on the bust might be a little too much for me.  I am a bit flat chested so excessive ease doesn't always serve a purpose on my figure.  Plus, with the gown being strapless I thought making it as tight as was comfortable would avoid some awkward flashings in the future.  Therefore, I cut out the bust at a size 8, giving it 1" of ease.  I kept the waist at a size 12 since the 1" of ease there seemed reasonable.

This was the result:
Muslin Bustier

AH!!! SO LOOSE!!! NO!!!! NO NO NO!!

As you may have surmised, the fit was not exactly what I intended.  You may not be able to tell from the picture, but there turned out to be a lot of ease!  It bubbled all around my dress form in sack-like manner, despite the form being slightly larger than me!  Even with the boning that it will eventually have, I had my doubts about this dress staying up let alone portraying a flattering, retro silhouette.  Back to the cutting board I went!

Muslin II/Taffeta
My second muslin/mockup, made of taffeta instead of cotton, went much better.  I reduced the bust to a size 6 (giving me 1/2" of ease) and the waist to a size 10 (giving me 1" of ease).


 The result:
 Taffeta Bustier

Much better!! It fits on the dress form (and me) quite nicely, with plenty of room for a zipper and boning.  It's much closer to the silhouette I imagined; no more sack!

In summary, I reduced the bust by two sizes (from size 10 to size 6) and the waist by one (from size 12 to size 10) to achieve my desired fit.  After my too-long foray into fitting, I finished cutting the dress out and I've started piecing it together.  It's turning out lovely and I can't wait to share my progress in my next post!

Until next time!

-The Gretchen