Hello!
I'm back! Yes, I haven't posted the finished product of my Christmas dress, I had to leave for college before I got around to it. But I swear it's done! Pictures will come eventually! I have since moved on, as you may have guessed, to Burda 6853 (you can find it online
here). This is what the pattern looks like:
 |
| The pattern! |
I'll be doing view "B". I absolutely fell in love when I saw it! I love how Chanel inspired it is while also being youthful (hence Burda "young," haha). Here's a picture of some classic Chanel suits, for reference (and so you don't think I'm a total nutcase!):
 |
| The suits! |
The pattern definitely isn't an exact replication, but in my mind it takes the idea of the classic suit in a different direction. I love the black trim and clean lines of the original, but I also love the pleats of the pattern!
Now onto my work....
The Materials
I chose this bluish-greenish-grayish wool (if you can think of a more exact name for the color, let me know!) from JoAnn Fabrics. I absolutely loved the weight and unique color; perfect for the winter season.
I initially had some trouble deciding on trim. The trim on the pattern cover is quite wide and I thought it looked considerably wider than the 3/4 in. trim called for. I couldn't find exactly what I was looking for at the store so I ended up buying this 1 1/2 in. Project Runway-inspired trim:
It's nice, but I soon discovered that it was way too wide! I should've known, but I was so excited to get started. I ended up icks-naying that and bought this trim from Etsy:
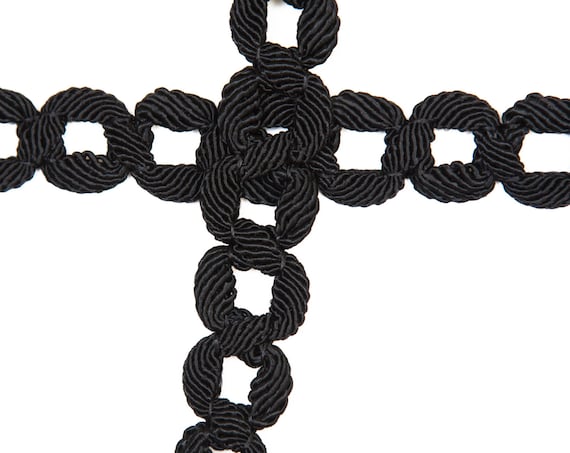
I haven't gotten it in the mail yet, but I'm hopeful! It's 1 inch wide and supposedly vintage, which always makes me happy. I wasn't sure how I felt about the open chain concept and being able to see the fabric underneath (not very Chanel). But in the end I decided that it was such a unique trim along with being the only one I liked, so it was worth the risk.
Finally, the buttons:
Just your sort of run-of-the mill, classic gold buttons.
Cutting and Fitting
I don't have too much to say about cutting out or fitting. Burda usually does an excellent job sizing its garments to the way I like them to fit on me (they run very true to size). I cut out the bust a size 8 and my hips a size 10. From what I've made so far, it fits like a dream!
Construction
Once again, not too much to say. The directions are relatively straightforward and I had no issues. But pleating can be tedious! It's worth it in the end, but keep in mind if you've never pleated or are ironing-adverse, you may be in for quite a learning curve.
I understitched the collar even though the directions don't tell you to. My lining was flipping outside, so if you have that problem, understitiching may help!
And then there's putting on the trim... I couldn't figure out when to do that, but I found that the very last direction is to put all the trim on after the garment is constructed (other than the trim on the pockets). I didn't really want to do that, partially because I don't want to see the trim stitching on my lining. I've halted construction until I get the trim, but here it is so far:
 |
| The threads on the bottom are basting to keep the pleats in place! |
I've put together the body of the dress and attached the lining to the neck, but not the arm holes. I've also put together the sleeves but not attached them yet. And I put in my label!
 |
| So gratifying to get it in!! Officially mine! |
That's it! I'll be posting pictures of the finished product after I get my trim, but if you have any questions in the meantime, let me know.
Until next time!
-The Gretchen