Showing posts with label retro. Show all posts

Tuesday, June 14, 2016

Sew Chic Tia Dress

To brighten up this dreary day, a sunny floral dress!

I absolutely fell in love when I saw this version of the Tia Dress Pattern from Sew Chic. 
Tia Dress from Sew Chic Patterns

Look how bright she looks in all that fog!  It's like a ray of flowery sunshine!

Tia Dress from Sew Chic Patterns
The pattern back from Sew Chic

I loved everything, the vintage cut, the large florals, the sweetheart neckline.  So, of course, I had to make my own version!  I already had some lovely, similar cotton floral in my stash from Fabric.com with bias tape from JoAnn Fabric.  I did decide to slightly stray from my inspiration, so instead of using red as the contrast, I used turqoise.

Here's my version!
Sew Chic Tia Dress by The Singing Sewist
The Front of the Dress.
I learned a little too late that Sew Chic's sizing includes very little, if any, wearing ease!  I cut out the size I measured out to, which was about a 4.  I ended up having to take out both side seams at least a quarter of an inch.  It still looks darling on, but now I know to pay attention next time I sew a Sew Chic pattern!

Sew Chic Tia Dress by The Singing Sewist
The Back of the Dress

Sew Chic Tia Dress by The Singing Sewist
Detail of the Front
Interestingly, even though the dress as a whole was a bit too small, the bust pieces had to be taken in.  What I mean is the two seams that split each boob in half had to be taken in.  It was fairly easy to do and not completely unexpected for my endearingly boyish figure.  

Sew Chic Tia Dress by The Singing Sewist
Pocket Detail
 I really enjoy the pockets, but putting on the blue bias tape absolutely mystified me.  I don't know if I was just having a blonde moment or what, but I could not figure it out for the life of me.  I ended up doing one pocket and then finally realized what I did wrong.  Oh well!

Sew Chic Tia Dress by The Singing Sewist
Detail of sleeve
 The the sleeves were a little too small, too.  Once again, if I had made a larger size...

Sew Chic Tia Dress by The Singing Sewist
Detail of the zipper
I have to admit, this zipper has brought me no honor.  Obviously, not my finest work.  To be fair, I'm pretty sure both my sewing machine and fabric had a vendetta against me the day I tried to put it in.  Nothing was cooperating!  And I hate regular zippers (INVISIBLE ZIPPERS FOR LYFE, YO). And my fabric was probably a little too thick (it was almost canvas weight).  What can I say, I lived, I learned.

Overall, I would still recommend this pattern for those of us who actually read directions (unlike my lovely, direction-skipping self).  It turned out beautifully despite all the errors on my part.  Make sure to take into account the amount of ease you have and don't use fabric that's too thick!

Until next time!

The Gretchen

Thursday, August 13, 2015

Simplicity 1250 Finished at last!

It. Is. Finished.

Well, actually, it's been finished... but I've also been lazy.

My planning post is here and my constructing post is here, both from waay back when, but there's no time in the internet, right?

And, as a reminder, here is the original pattern (which you can also find online here):
Simplicity 1250 Pattern
But putting procrastination in the past, I present to you, my 2014 CHRISTMAS DRESS!!! YAAAAAAAAAASSSSSSSSS!!!!!!

Simplicity 1250 Front w/Jacket
The front w/jacket, not too shabby, eh?

Simplicity 1250 Front w/Jacket Detail
Dress w/jacket detail
Simplicity 1250 Back w/Jacket
Dress w/jacket back

Simplicity 1250 Front
Ta-Da!  The front of the dress.
As you can see the peplum is attached to the dress itself, not the jacket.

Simplicity 1250 Back
The Back!
I did wear a petticoat under this dress (but not too floofy!).  I fioud it looked a bit more complete with it and balanced out my top half better.

Simplicity 1250 Bust Detail
Dress Bust Detail
The bust is pleated... yeah, that's all you really need to know.
Simplicity 1250 Jacket Front
Jacket Front
SO MANY BUTTONS.  I actually did not finish the buttons in time for the Christmas service I was singing at, so I ended up wearing the jacket without any.  I don't think anyone noticed, haha.  But I did go back since I had already bought all of them, and put every stinkin' shiny gold button on.  I love it, but it was a lot of labor (a labor of love?).

Simlpicity 1250 Jacket Back
Jacket Back
Simplicity 1250 Jacket Detail
Jacket Detailing
And for funsies, here is my inspiration and my finished product:

Alexander McQueen Plaid Dress
McQueen lookin' mean...

Simplicity 1250 Front w/Jacket
...versus fifties flirty fluff!

Mine is pretty tame, haha, but I'm also pretty proud of it!

Anyways, on to the nitty gritty (or what I can remember of it).  I covered most of this in my fitting/cutting out post, but there was at least one thing I wanted to add.  Match up the plaid on the sides.  Do it.  Not what I did (I forgot?).  I was very naughty.  Do as I say, not as I do, right?

As an overall review of the pattern, I really do love how it turned out.  However, I recollect that it was quite a bit of work and kind of fussy (BUTTONS, button loops, bias facings, boning, plaid - although the plaid mayy have been my fault...).  I cannot say I recommend the pattern for a beginning sewer, but maybe an average/mid skilled sewer who won't mind a little extra fiddley-ness.  And someone with a bit of time; it's definitely no walk-away dress!

Well, that's all I can think to say about it, but if you have any questions, feel free to ask!

Until next time,

-The Gretchen


Wednesday, July 15, 2015

Fall Vogue 2015 Top Picks

Ah! Fall is in the air!

Wait! In July, you say?

Well, according to Vogue Patterns autumn is just around the corner!

In case you didn't know, Vogue just came out with their new line of fall patterns.  There are a couple things I may never make, but I thought I'd give my two cents on the highlights of the group.

Firstly, new vintage!  Yay!! I adore vintage patterns and Vogue's newest releases will most likely be finding their way into my collection.

Here is Vogue pattern V9127:

Vogue V9127
Vogue Pattern V9127
It seems to be 1940's (ish?) and it might not be my all time favorite vintage silhouette, but look at that detailing:

V9127 front detail
How?  Just, how?
I'd just buy the pattern to figure out how one recreates that arrow-like stitching.  And is that a pocket on the lapel?  And how does that belt-thing work?  It's a pattern chock-full of mysteries!

V9127 alt. front view
An even better question, what the heck would I use a pocket there for?

My only beef with it is it doesn't seem to fix the model in the back.  Take a look for yourself:

V9127 back view
Something seems a bit off...

Maybe it's just me, but if I were to make this pattern, I'd like it to be more closely fitted and less wrinkly in the back.  I think it would give it a cleaner look and allow for the eye to have complete focus on the beautiful tailoring.
  
It also has a short-sleeved option (minus the belt of mystery):

V9127 short sleeve drawing


But I like the other vintage dress even more, Vogue pattern V9126:

V9126 pattern
Vogue Pattern V9126
 I'm not sure if it's the pattern itself or the styling of the pattern that I'm in love with.  Very glamorous, and the model is incredibly (and maybe intentionally) similar to Dita Von Teese!

V9126 front detail
Up Close - look at her perfect make up!
V9126 back
Leopard Print Love!!
Imagine going to a cocktail party dressed like that!  You'd surely be the talk of the town (and for all the right reasons!).  

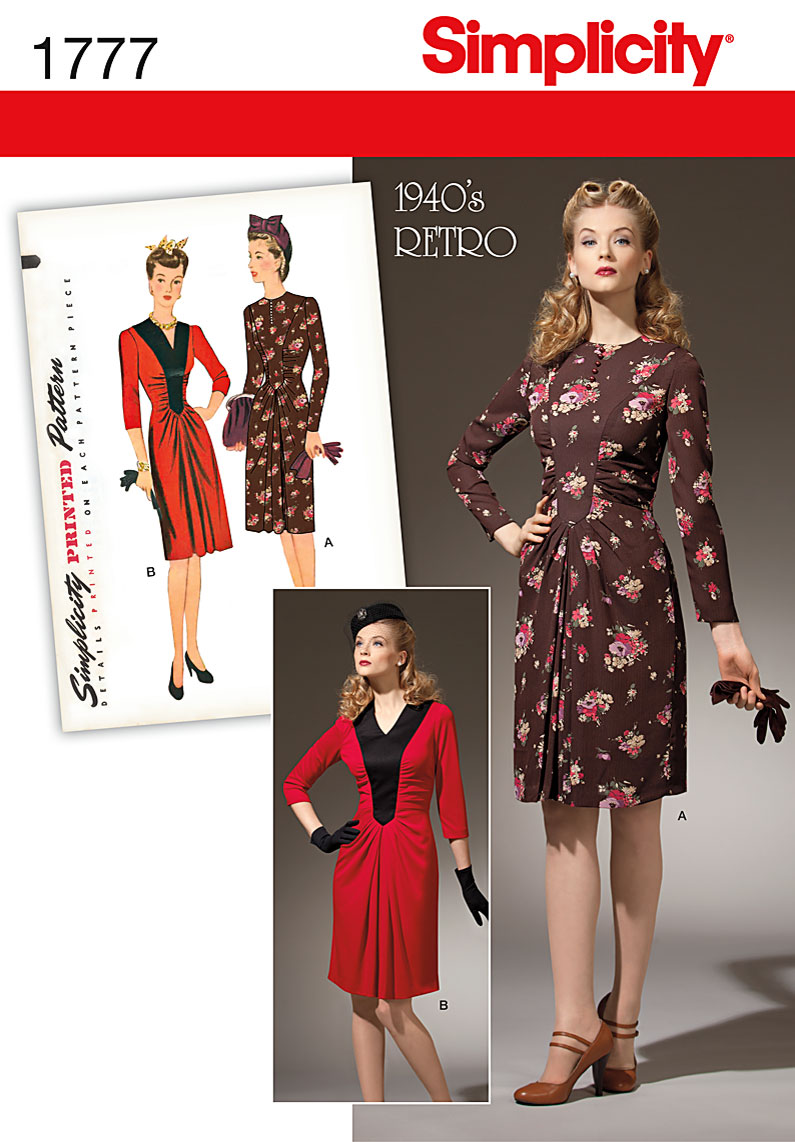
Although it does remind me an awful lot of this Simplicity pattern 1777:

Simplicity pattern 1777


But shhhh, we'll just keep that between us and Vogue...

Other than the vintage patterns, I have to say that the only other pattern I had a hankering for was Vogue pattern V1460:

V1460 Pattern
Vogue Pattern V1460
I love how simple it is, but I do have one concern.  Is it just me, or does it seem to strangely emphasize the belly?

V1460 Alt. View


I'm sure that model is as thin as can be, but the dress makes it look like she's got something in the oven!  It makes me a bit wary of the pattern, so I'm a bit hesitant to buy it...

Anyways, those are my top three picks for Vogue's 2015 Fall Collection!  Are there any favorites you have?

Until next time,

-The Gretchen

Tuesday, November 25, 2014

Simplicity 1250 - Fitting and Cutting Out

Alas! I have begun my Christmas dress! And a month before Christmas; I'm rather impressed with myself.  If you're just dropping in now, I'm making Simplicity pattern 1250 for my Christmas dress (fingers crossed!).  You can find my initial planning post here.  You can also find my finished product here!

The pattern (I'm doing view A)
Simplicity 1250


Firstly: my fabric choices! I did stick to the originally planned plaid with black lace.  Upon visiting both Hancock and Joann's I realized my selection was slim and I had take what I could get.  There was literally next to no taffeta-esque tartan in stock at my stores this year!  It's a little weird, especially considering that there has been an abundance in previous years.  And it was slim pickings online, too!  Ah well, I'm pretty pleased with my choice anyways.

The plaid with lace and gold buttons

Red Plaid Lace Buttons

 The  classic red tartan with green is growing on me.  Plus it's got some shiny gold to sparkle it up!

After bringing my fabric home, I was very well behaved and did make a muslin for the top bustier area.  I would highly recommend doing it due to the close fitting nature of the bustier, even if you normally avoid making muslins (as I do) .  I ended up doing two, one in muslin and one in a red taffeta that's a similar to the plaid I'll be using.

Measuring/Ease
My bust measurement is 32" and my waist is 26".  I'm in between the sizes specified on this pattern, with a size 10 at the bust being 32.5" and a size 12 at the waist being 26.5" (pretty close).  Normally Simplicity patterns give quite a bit of ease, but this pattern surprised me. On the pattern tissue it says that there is 2" of ease for the bust (34.5" finished measurement for size 10) and 1" of ease at the waist (27.5" finished measurement for size 12).  Much less ease than expected, but it sounded good to me!

Muslin I
The initial muslin was... interesting.  I decided that 2" of ease on the bust might be a little too much for me.  I am a bit flat chested so excessive ease doesn't always serve a purpose on my figure.  Plus, with the gown being strapless I thought making it as tight as was comfortable would avoid some awkward flashings in the future.  Therefore, I cut out the bust at a size 8, giving it 1" of ease.  I kept the waist at a size 12 since the 1" of ease there seemed reasonable.

This was the result:
Muslin Bustier

AH!!! SO LOOSE!!! NO!!!! NO NO NO!!

As you may have surmised, the fit was not exactly what I intended.  You may not be able to tell from the picture, but there turned out to be a lot of ease!  It bubbled all around my dress form in sack-like manner, despite the form being slightly larger than me!  Even with the boning that it will eventually have, I had my doubts about this dress staying up let alone portraying a flattering, retro silhouette.  Back to the cutting board I went!

Muslin II/Taffeta
My second muslin/mockup, made of taffeta instead of cotton, went much better.  I reduced the bust to a size 6 (giving me 1/2" of ease) and the waist to a size 10 (giving me 1" of ease).


 The result:
 Taffeta Bustier

Much better!! It fits on the dress form (and me) quite nicely, with plenty of room for a zipper and boning.  It's much closer to the silhouette I imagined; no more sack!

In summary, I reduced the bust by two sizes (from size 10 to size 6) and the waist by one (from size 12 to size 10) to achieve my desired fit.  After my too-long foray into fitting, I finished cutting the dress out and I've started piecing it together.  It's turning out lovely and I can't wait to share my progress in my next post!

Until next time!

-The Gretchen